Bread recipe for wood fired oven: Discover the unique artistry and flavor of wood-fired bread, a culinary journey that takes you beyond the ordinary. This method offers a different experience compared to conventional ovens, resulting in a distinct taste and texture. Explore the world of focaccia, pizza, and more, while delving into the history and cultural significance of this baking tradition.
This recipe will guide you through the entire process, from ingredient selection to shaping and baking, ensuring you create a truly exceptional loaf. Learn the secrets of achieving optimal dough texture and rise, along with the specific considerations for baking in a wood-fired oven.
Introduction to Wood-Fired Oven Bread
Wood-fired oven bread boasts a unique flavor and texture achieved through the intense heat and direct contact with the oven’s hot surfaces. This method results in a crust that is deeply caramelized and often crispy, contrasting with a tender interior. The flavor is often more complex and pronounced than bread baked in a conventional oven, thanks to the interplay of heat and smoke.This distinctive character arises from the different thermal properties of a wood-fired oven.
The intense heat and indirect baking methods produce a crust that is different from the more uniform crust achievable in a conventional oven. This method is a fundamental departure from conventional baking, impacting both the bread’s appearance and its taste.
Defining Wood-Fired Oven Bread
Wood-fired oven bread is characterized by its unique flavor profile, resulting from the intense heat and smoke produced by burning wood. The high temperatures and direct contact with the oven’s hot surfaces create a deep, crispy crust and a tender interior. This method distinguishes it from conventional oven baking, where temperatures are regulated more precisely and indirectly.
Types of Wood-Fired Oven Bread
A diverse array of breads can be baked in a wood-fired oven. Examples include focaccia, a flatbread often topped with herbs and olive oil; pizza, which features a thin crust and a variety of toppings; and rustic loaves, known for their artisanal appearance and rich flavor. The variety of styles reflects the versatility of the wood-fired oven’s capabilities.
History and Cultural Significance
The use of wood-fired ovens for baking bread dates back centuries. In many cultures, it represents a connection to tradition and heritage, often intertwined with community gatherings and celebrations. The art of baking in a wood-fired oven is deeply ingrained in the cultural practices of regions around the world, including Italy, France, and parts of the Mediterranean. It’s a technique that has been passed down through generations, reflecting a deep respect for the craft and the quality of the ingredients.
Comparison of Dough for Wood-Fired and Conventional Ovens
| Ingredient | Quantity (Example) | Purpose | Texture |
|---|---|---|---|
| Flour (e.g., bread flour) | 500g | Provides structure and gluten development | Stronger gluten structure for wood-fired oven, potentially slightly softer for conventional |
| Water | 300-350ml | Hydrates the flour and activates the yeast | Similar hydration level, but can be affected by oven temperature |
| Yeast | 2 teaspoons | Raises the dough, creating volume | Yeast activity depends on the temperature in both types of ovens |
| Salt | 10g | Enhances flavor and regulates the yeast | Similar effect on both types of ovens |
| Olive oil (or other fat) | 1 tablespoon | Adds flavor and moisture to the dough | Improves moisture retention in the dough |
Ingredients for Wood-Fired Oven Bread
The heart of any exceptional bread lies in its ingredients. Wood-fired oven bread, with its unique character, demands a careful selection of components to achieve its signature crisp crust and airy interior. Understanding the role each ingredient plays is key to crafting a truly satisfying loaf.The quality of the ingredients directly impacts the final product. From the flour’s protein content to the yeast’s activity, each element contributes to the bread’s texture, flavor, and overall experience.
Choosing high-quality, locally sourced ingredients whenever possible will yield the best results.
Essential Ingredients
The fundamental ingredients for wood-fired oven bread are flour, water, yeast, and salt. These basic components are the building blocks that create the structure and flavor of the bread. Their precise proportions and quality determine the final outcome.
Types of Flour
Different flours exhibit unique characteristics, impacting the bread’s texture and flavor. Choosing the right flour is crucial for achieving the desired outcome.
- Bread flour, with its higher protein content, creates a stronger gluten structure, resulting in a chewier and more elastic loaf. This high gluten content is ideal for breads requiring a substantial amount of handling and rising.
- All-purpose flour, a versatile option, provides a balance between strength and flexibility, suitable for various baking applications. Its moderate protein content makes it a good choice for those seeking a less chewy bread.
- Whole wheat flour, with its bran and germ components, adds a nutty flavor and fiber to the bread. The presence of these components often results in a denser and slightly more rustic loaf. However, the gluten development may be affected, potentially resulting in a less elastic final product.
Types of Yeast
The choice of yeast significantly influences the bread’s rise and flavor. Different types have unique characteristics, and their selection depends on the desired outcome.
- Active dry yeast is a common choice, offering reliable leavening and a characteristically mild flavor. It requires hydration and activation before use. The rise time may vary depending on the ambient temperature.
- Instant yeast, also known as rapid-rise yeast, requires no activation and offers a quick rise time. This is beneficial for those seeking a faster baking process.
- Fresh yeast, often referred to as compressed yeast, provides a robust flavor and is more potent than other types. It necessitates careful handling and storage to maintain its viability.
Ingredient Table
| Ingredient | Quantity | Function |
|---|---|---|
| Bread Flour | 500g | Provides structure and elasticity to the dough. |
| Water | 300ml | Hydrates the flour, activates the yeast, and forms the dough’s liquid component. |
| Active Dry Yeast | 7g | Provides leavening and contributes to the bread’s texture. |
| Salt | 10g | Enhances flavor, controls yeast activity, and contributes to the bread’s structure. |
Dough Preparation for Wood-Fired Oven Bread
Crafting exceptional wood-fired oven bread begins with meticulous dough preparation. This crucial step sets the stage for the final product’s texture, rise, and overall deliciousness. Understanding the nuances of mixing, kneading, and proofing is paramount to achieving optimal results in a wood-fired oven, which demands a dough that can withstand the intense heat and develop a satisfyingly crisp crust.The dough’s structure and development directly impact the bread’s final form.
Proper hydration, mixing techniques, and kneading time all play a vital role in shaping the bread’s texture and interior structure. By following a methodical approach to dough preparation, you can ensure a consistent and impressive outcome every time.
Mixing the Dough
Thorough mixing is fundamental for developing gluten, which provides the structure for the bread. The gluten network formed during mixing allows the dough to trap gases produced during fermentation, leading to a light and airy texture. Incorporating all ingredients evenly is critical to achieving a uniform dough.
- Combine dry ingredients (flour, salt, yeast, if using). This step ensures that the dry ingredients are evenly distributed before adding the wet components. Ensure all ingredients are at room temperature for optimal mixing and gluten development.
- Gradually add the liquid ingredients (water, milk, or other liquids) to the dry ingredients. Start with a low speed to avoid creating a sticky mess, gradually increasing the speed as the dough begins to come together. The consistency of the dough should be smooth and slightly tacky, not dry or overly wet.
- Mix until a shaggy dough forms. This stage indicates the initial development of the gluten network. The dough will appear rough and uneven. Continue mixing until a smooth, elastic dough forms.
Kneading the Dough
Kneading is a crucial step in developing the gluten structure in the dough. It strengthens the gluten network, enabling the dough to rise and hold its shape during baking. Kneading also helps distribute the yeast and ensures the dough is uniformly developed. Different kneading techniques can yield different textures.
- Turn the dough out onto a lightly floured surface. Begin kneading the dough by gently folding and turning it over. This process helps develop the gluten network.
- Gradually increase the kneading pressure as the dough becomes more elastic. Aim for a smooth, elastic dough that is no longer sticky. The kneading process should take between 8-12 minutes for optimal gluten development. For some recipes, you may opt to use a stand mixer or a bread machine for kneading.
- Shape the dough into a ball and place it in a lightly oiled bowl, turning to coat the surface. Cover the bowl with plastic wrap or a damp cloth to prevent the dough from drying out. This step is important to maintain moisture in the dough and promote further development of the gluten.
Proofing the Dough
Proofing allows the yeast to ferment and produce carbon dioxide, which is essential for the dough’s rise. The proofing process should be monitored carefully to avoid overproofing or underproofing, both of which can affect the bread’s texture and flavor.
- Place the shaped dough in a lightly oiled bowl, turning to coat the surface. Cover the bowl with plastic wrap or a damp cloth to prevent the dough from drying out.
- Allow the dough to rise in a warm place for 1-2 hours, or until it has doubled in size. The ideal proofing temperature is between 75-80°F (24-27°C). This process allows the yeast to ferment and develop the desired flavor and texture.
- Check the dough periodically to monitor its rising. Once the dough has risen, it is ready for shaping and baking.
Baking in a Wood-Fired Oven
Baking bread in a wood-fired oven presents a unique set of challenges and rewards. The intense, fluctuating heat and the mesmerizing dance of flames create a truly special baking experience, resulting in breads with distinctive flavors and textures. Understanding the nuances of this method is crucial for achieving exceptional results.The heat from a wood-fired oven is unlike any other.
It’s characterized by its extreme temperature fluctuations, reaching scorching highs and then cooling down, followed by another surge. This dynamic heat profile is what gives wood-fired bread its signature characteristics. The rapid heat transfer creates a crisp crust and a tender interior.
Temperature Considerations
Oven temperature is paramount in wood-fired oven baking. A precise temperature control is crucial to achieve a desirable crust and interior. Variations in temperature can greatly affect the baking time and the final product’s quality. The oven’s temperature is not static; it changes during the baking process. Therefore, careful monitoring and adjustments are needed to maintain the desired temperature range.
Heat’s Impact on Bread
The intense heat from a wood-fired oven rapidly heats the bread’s surface, creating a thick, crackled crust. The fluctuating heat causes the crust to form a complex texture, adding to the overall sensory experience. The interior of the bread benefits from the even, though not perfectly even, heat distribution within the oven, creating a tender and airy crumb structure.
This uneven heating is a key component of wood-fired bread’s unique character.
Ideal Baking Temperatures
Precise temperature control is crucial for achieving the best results. The ideal temperature range varies depending on the type of bread being baked. Consistent monitoring and adjustments are necessary to maintain the desired temperature. The following table provides a general guideline for ideal temperature ranges for various types of wood-fired oven bread.
| Bread Type | Ideal Temperature (°C) | Baking Time (approx.) |
|---|---|---|
| Ciabatta | 450-500 | 20-25 minutes |
| Focaccia | 400-450 | 15-20 minutes |
| Pizza | 450-550 | 5-10 minutes |
| Baguette | 480-520 | 15-20 minutes |
| Sourdough | 480-520 | 25-35 minutes |
Techniques for Shaping Wood-Fired Oven Bread

Transforming dough into a visually appealing and texturally satisfying loaf is crucial for wood-fired oven bread. The shaping process not only impacts the aesthetic but also influences the bread’s internal structure and final texture. Different techniques yield unique results, each with its own charm and characteristics.The choice of shaping technique is dictated by the desired outcome. A tightly closed boule, for example, will develop a crisp crust and a tender interior.
Conversely, a more open and airy shape, like a focaccia, allows for a more rustic and texturally varied result. Careful handling and attention to detail during the shaping process are vital for achieving the best possible outcome.
Focaccia Shaping
Focaccia, with its characteristic flatbread form, benefits from a more relaxed shaping technique. The dough is typically pre-shaped into a rectangular or circular base, then adorned with various toppings. This open structure allows for a more rustic and uneven texture. The toppings, whether herbs, olives, or other ingredients, add to the visual appeal and unique flavor profiles of the focaccia.
Boule Shaping
The boule, a round loaf, is often associated with a more traditional approach to bread baking. The dough is meticulously shaped into a smooth, symmetrical sphere. This technique promotes even baking and a consistent crust. A tight, closed shape allows for a crisp crust and a tender crumb.
Ciabatta Shaping, Bread recipe for wood fired oven
Ciabatta, with its characteristic long, slightly pointed shape, is distinctive. The dough is often shaped by folding and twisting to achieve the signature form. This shaping method results in a unique, open texture and a slightly irregular surface. The open structure allows for a significant amount of oven spring, creating a light and airy interior.
Table of Shaping Techniques
| Shape | Method | Image Description |
|---|---|---|
| Focaccia | The dough is pre-shaped into a rectangle or circle, then topped with various ingredients. | A flat, slightly irregular loaf with visible toppings scattered across its surface. The crust is slightly uneven and varies in color depending on the ingredients. |
| Boule | The dough is carefully shaped into a smooth, symmetrical sphere. | A round, closed loaf with a uniform, smooth surface. The crust is typically well-defined and exhibits a deep golden-brown color, particularly in the areas directly exposed to the heat. |
| Ciabatta | The dough is folded and twisted to achieve its characteristic long, pointed shape. | A long, slightly irregular loaf with a slightly pointed end. The surface has a distinctive open structure, with visible air pockets throughout. The crust shows a light golden-brown color with some darker areas, especially around the edges. |
Troubleshooting Wood-Fired Oven Bread
Baking bread in a wood-fired oven presents unique challenges that require careful attention and understanding. The intense heat, unpredictable temperature fluctuations, and the oven’s inherent limitations can lead to variations in the final product. This section details potential issues and offers solutions to help you achieve consistently delicious results.Understanding the oven’s behavior and the bread’s response to its environment is crucial for troubleshooting.
Factors like the type of wood used, the duration and intensity of the fire, and the positioning of the bread within the oven all contribute to the final outcome. By understanding these variables, you can anticipate potential problems and adjust your technique accordingly.
Uneven Baking
Achieving even baking in a wood-fired oven requires precise placement and careful monitoring. Variations in heat distribution across the oven are common. Placing the bread too close to the fire will result in over-baked, charred areas, while placement too far away may lead to undercooked or pale bread. Strategic placement and adjusting the baking time based on the oven’s temperature variations are key.
Dough Collapse
Dough collapse, where the bread flattens during baking, can occur due to insufficient proofing, excessive heat, or uneven heat distribution. Adequate proofing allows the gluten to develop properly, enabling the bread to hold its shape. High oven temperatures, particularly when the dough is not fully proofed, can cause the bread to collapse. Maintaining consistent temperature and carefully monitoring the baking process are crucial to avoid this issue.
Crust Issues
A desirable crust is often a hallmark of well-baked wood-fired bread. However, problems such as a too-thin or too-thick crust, or a crust that’s unevenly browned, can occur. These problems stem from variations in oven temperature, moisture content of the dough, and the positioning of the bread within the oven. Adjusting the dough’s hydration level, using a well-preheated oven, and monitoring the baking time can address these issues.
Under- or Over-Baking
Under-baked bread may be dense and lacking in flavor, while over-baked bread will be dry and brittle. Wood-fired ovens can exhibit significant temperature fluctuations, making it essential to constantly monitor the baking process. Using a reliable thermometer and adjusting the baking time according to the oven’s temperature are crucial for achieving the desired doneness. Using a pyrometer to accurately gauge the oven’s temperature is an excellent tool for maintaining consistency.
Troubleshooting Tips
- Accurate Temperature Monitoring: Employ a reliable thermometer to track the oven’s temperature during the baking process. This allows for precise adjustments to baking time and provides valuable data for future baking sessions. Using a pyrometer will provide even more accurate and comprehensive data.
- Strategic Placement: Experiment with different positions within the oven to find the ideal location for your bread. Consider factors such as the heat source’s location and the oven’s overall temperature distribution. Avoid placing loaves directly on the oven’s hot surface.
- Adjusting Baking Time: Wood-fired ovens often require adjustments to baking times compared to conventional ovens. Be prepared to adapt your baking times based on the oven’s temperature variations. Start with shorter baking times and gradually increase them as needed to achieve the desired outcome.
Specific Challenges of Wood-Fired Oven Baking
- Unpredictable Temperatures: Wood-fired ovens are known for their unpredictable temperature fluctuations. This requires constant monitoring and adjustments to baking times. A pyrometer can provide invaluable insight into these temperature changes.
- Heat Distribution Variations: The heat distribution within a wood-fired oven can vary significantly, leading to uneven baking. Careful placement of the bread within the oven is critical to mitigate these variations. Positioning the bread away from direct heat sources can help to reduce uneven baking.
- Fire Management: Managing the fire is essential for controlling the oven’s temperature. Appropriate wood selection and careful monitoring of the fire’s intensity are crucial for consistent results.
Common Errors and Remedies
| Error | Remedy |
|---|---|
| Unevenly baked bread | Adjust bread placement within the oven; monitor the oven’s temperature closely; adjust baking time. |
| Dough collapse | Ensure adequate proofing; adjust oven temperature; consider using a higher hydration dough. |
| Over- or under-baked crust | Adjust baking time and oven temperature; monitor closely; consider adding a layer of aluminum foil or using a lid if needed. |
Variations and Additions to Wood-Fired Oven Bread: Bread Recipe For Wood Fired Oven
Elevating your wood-fired oven bread beyond a basic recipe involves exploring a world of flavor and texture variations. By incorporating different herbs, spices, and seeds, you can transform a simple loaf into a culinary masterpiece, tailored to your personal preferences. These additions not only enhance the taste but also influence the final product’s aesthetic appeal and overall experience.
Hey there! Making bread in a wood-fired oven is super fun, right? It’s like magic, the way the heat makes the dough rise and the crust gets all crispy. If you’re looking for ways to make your body feel its best, checking out the weight loss doctors in Beaumont Texas could be a great idea. weight loss doctors in beaumont texas They can help you achieve your goals, and that’s important.
No matter what, that wood-fired bread recipe is still the bomb, though!
Incorporating Herbs, Spices, and Seeds
Understanding how herbs, spices, and seeds react with the dough is crucial for achieving the desired flavor profile. Different ingredients react differently to the intense heat of the wood-fired oven. Some herbs and spices, like rosemary and oregano, impart a pronounced aroma, while others, like fennel seeds, add a subtle complexity. Experimentation is key to discovering your favorite combinations.
Examples of Unique and Flavorful Additions
A wide array of additions can elevate your wood-fired oven bread. Consider incorporating sun-dried tomatoes and herbs for a Mediterranean twist, or roasted garlic and Parmesan for a rich, savory loaf. Spiced variations, such as incorporating cinnamon and nutmeg, can create a warm and comforting aroma. Whole grains like rye or spelt can be added to the dough for added nutritional value and a unique texture.
Impact on Taste and Texture
The impact of these additions on the final product is significant. Herbs and spices can dramatically alter the taste, creating a more complex and layered flavor profile. For instance, adding rosemary intensifies the inherent earthy notes of the bread. Similarly, the addition of seeds like poppy or sesame can add a delightful crunch to the texture. Whole grains like spelt or rye, while enriching the flavor, also create a denser, heartier bread.
Different Types of Additions
| Category | Examples | Impact on Taste and Texture |
|---|---|---|
| Herbs | Rosemary, oregano, thyme, basil | Adds aromatic complexity and depth of flavor; may affect the crust’s color and texture. |
| Spices | Garlic powder, onion powder, paprika, chili flakes | Adds savory or spicy notes; can affect the overall aroma and color. |
| Seeds | Poppy seeds, sesame seeds, sunflower seeds, nigella seeds | Adds a delightful crunch and subtle flavor; may affect the crust’s appearance. |
| Vegetables | Sun-dried tomatoes, roasted garlic, red peppers | Adds savory depth and unique flavors; may influence the dough’s color and moisture content. |
| Whole Grains | Spelt, rye, kamut | Enhances the flavor and creates a denser, heartier texture; may influence the dough’s elasticity. |
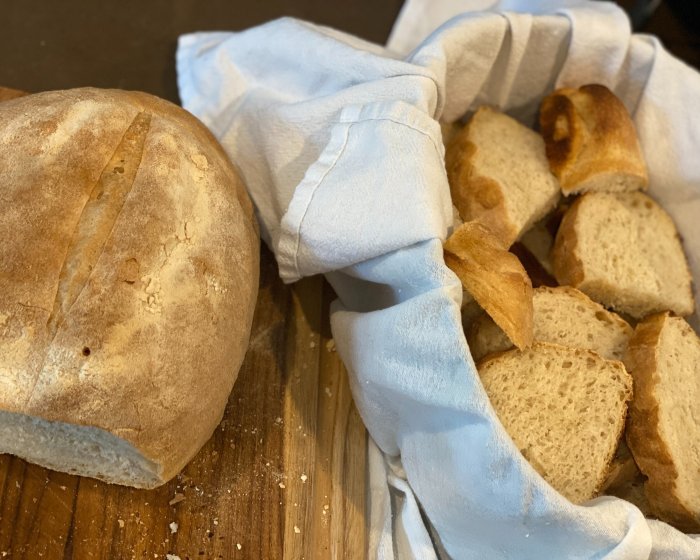
Serving Suggestions for Wood-Fired Oven Bread
Wood-fired oven bread boasts a unique texture and flavor profile, making it a versatile accompaniment to a wide array of dishes. Its crisp exterior and soft interior, often infused with smoky notes, provide a satisfying contrast to various culinary experiences. This section details how to best showcase the delicious characteristics of wood-fired oven bread.
Pairing with Meals
The robust flavor of wood-fired oven bread complements a variety of dishes. Its crisp crust and airy crumb can be a wonderful foil for savory flavors and textures. Pairing it with a rich soup, a hearty stew, or a flavorful salad enhances the overall dining experience.
- With Soups and Stews: The bread’s ability to absorb the flavors of the broth and its crispiness makes it a fantastic accompaniment to soups and stews. The warm bread soaks up the rich broth, enhancing the overall experience. For example, a creamy tomato soup with a crusty wood-fired oven loaf offers a perfect blend of textures and flavors. Likewise, a hearty lentil stew pairs well with the bread’s robustness, creating a balanced meal.
- With Salads: The bread’s crispness provides a contrasting texture to the freshness of a salad. A simple green salad with a light vinaigrette is enhanced by the bread’s ability to absorb the dressing. A wood-fired oven loaf offers a satisfying counterpoint to the light and refreshing salad components.
- With Cheese and Charcuterie Boards: The bread’s warm, slightly smoky flavor perfectly complements cheeses, cured meats, and olives. The bread’s crisp exterior provides a delightful contrast to the soft textures of cheeses and the salty flavors of cured meats. A selection of artisan cheeses, cured salami, and olives, paired with a loaf of wood-fired oven bread, creates a luxurious appetizer or snack experience.
Making bread in a wood-fired oven is totally awesome, right? It’s like, seriously good, the crust is crispy and the inside is soft. Speaking of amazing treats, have you checked out the Baskin Robbins Cappuccino Blast recipe? baskin robbins cappuccino blast recipe It’s a real winner, a creamy, cool blast! But seriously, that wood-fired bread recipe is a must-try.
You’ll be stoked!
Beverage Pairings
The unique character of wood-fired oven bread also harmonizes well with a variety of beverages. Consider the nuances of both the bread and the drink when making a pairing.
- Wine: The bread’s robust flavors can stand up to bold red wines, such as Cabernet Sauvignon or Pinot Noir. The smoky notes of the bread can complement the fruitiness of the wine. For example, a glass of robust Cabernet Sauvignon pairs well with a wood-fired oven loaf and a hearty beef stew. Conversely, a crisp white wine, such as Sauvignon Blanc, can complement salads and lighter dishes featuring the bread.
- Beer: The bread’s robust flavors also pair well with stouts or porters, which offer a similar depth of flavor. The bread’s smoky character will enhance the experience of a well-brewed stout. Similarly, a pale ale or wheat beer can offer a refreshing complement to the bread, especially when served with lighter fare.
- Water: Simple water, particularly sparkling water, is a neutral option that allows the bread’s flavor to shine through. The bread’s inherent flavor and texture are perfectly suited to the crisp refreshment of sparkling water.
Presentation
Proper presentation can elevate the dining experience. Consider the visual appeal of the bread, whether as a centerpiece or a side dish.
- Presentation Style: A simple, elegant presentation of the bread is often ideal. A single, nicely sliced loaf or several smaller, individually sliced pieces presented on a wooden platter can highlight the bread’s texture and appearance. A simple arrangement on a plate or platter with accompanying dishes can add to the overall aesthetic.
- Plating Suggestions: Consider the overall plating of the meal when positioning the bread. If the meal includes a variety of textures and colors, a loaf of wood-fired oven bread can provide a contrasting element. A single loaf can serve as a centerpiece, allowing guests to serve themselves, or individual slices can be placed on plates, ready for consumption.
Epilogue
In conclusion, baking bread in a wood-fired oven is a rewarding experience. From selecting the perfect ingredients to mastering the shaping techniques and navigating potential issues, this comprehensive guide provides all the knowledge needed for success. Embrace the unique flavors and textures that a wood-fired oven offers, and enjoy the process of creating a truly special loaf of bread.
Question & Answer Hub
What are some common mistakes when baking bread in a wood-fired oven?
Common mistakes include not preheating the oven properly, using the wrong type of wood, or placing the bread too close to the heat source, leading to uneven baking. Proper temperature control is key to avoiding a burnt or undercooked loaf.
What kind of flour is best for wood-fired oven bread?
High-protein flours, such as bread flour, are generally preferred for their strength and ability to hold their shape in the intense heat of a wood-fired oven. However, other flours can be used successfully, depending on the desired outcome.
How long does it typically take to bake a loaf of wood-fired oven bread?
Baking time varies depending on the type of bread and the specific wood-fired oven. A general guideline is that it takes longer to bake in a wood-fired oven compared to a conventional oven. Refer to the recipe’s specific instructions for guidance.
What are some alternative shaping techniques for wood-fired oven bread?
Besides focaccia, boule, and ciabatta, you can explore other shaping methods like batards, pains de campagne, or even try creative variations by incorporating herbs or spices directly into the dough for unique shapes and flavors.
